Skin Blends’ Royalty Waxing Services
Royalty waxing services surpass the typical “wax on wax off” procedures which will make you stand out amongst your competition. Clients talk; as licensed skin care experts we should be treating the skin both before and after waxing, preventing cross contamination, providing a thorough consultation, and recommending proper home care. Clients will appreciate and reward your efforts with enhanced loyalty and referrals.
>> STEP 1 – Consultation
Perform Client Consultation to protect client from potential harm, as well to explain what they can expect from the service and how to care for skin after service. This is a great time to cross promote other services including potential new waxing areas.
This is the perfect time to sanitize client’s hands as well as they will be probably touch their exposed skin once hair has been removed. Put gloves on. (TIP Put small amount of oil on gloves to prevent gloves from sticking to wax). To begin prep all products and tools to prevent cross contamination.
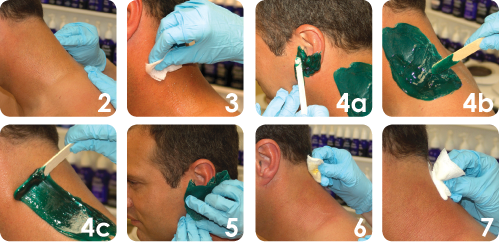
>> STEP 2 – Cleanse
Use gauze with Pre & Post Wax Cleanser to prepare, cleanse, and protect skin. This will reduce bacteria count to help prevent follicle infection and breakout. The menthol and grapefruit extracts help the hair stand up for more efficient waxing. While applying, check direction of hair growth and condition of hair.
>> STEP 3 – Protect
Apply gauze with Pre & Post Wax Oil to create a protective barrier on the skin. This step makes the waxing service less painful and reduces the risk of lifting skin during the procedure. Be sure to wipe off the excess oil otherwise wax will roll off the skin.
>> STEP 4 – Deposit and Spread Wax
Using a disposable applicator (no double dipping), remove a generous amount of wax from the heater. Turn applicator several rotations to disconnect wax from the tin to lessen dripping. Wipe/deposit the wax from each side of the applicator on the skin then spread while applying pressure in the direction of hair growth.
“Hard Wax” – thicker application leaving ridge around perimeter for easier removal (“Figure 8” application).
“Strip Wax” – use narrow edge of side of applicator at a reverse 45 degree angle (“Snow Plow” application) and pull toward you for super thin application (like saran wrap).
>> STEP 5 – Removal
Remove by pulling wax or strip off skin as close to the skin as possible in the opposite direction of hair growth to prevent lifting, bruising, and pain.
>> STEP 6 – Soothe
Using gauze with Wax Recovery Gel, to soothe skin, calm redness, and remove wax residue. This will simultaneously cool the temperature of the skin and reduce the chance of breakouts caused by follicle trauma. If necessary use Pre & Post Wax Oil afterwards.
>> STEP 7 – Reduce
Use gauze with Less Hair Lotion to reduce inflammation, calm irritated skin, and slow hair re-growth.
>> STEP 8 – Rebook and Home Care
Rebook client and suggest home care products. Less Hair Lotion, Get Acquainted Package (GAP) for Body, Benzoyl Peroxide Scrub, Alpha Beta X (6% Lactic, 3% Glycolic and 1% Salicylic), and SPF 30 (Lotion, Gel, or Cream) are all appropriate after waxing service to soothe, protect, and exfoliate skin. Contact customer 24 to 48 hours after service to make sure they are not experiencing any problems. Thank them for their patronage and ask for referrals.
For more information please contact Skin Blends at 877-754-6253, www.skinblends.com, CRR# 181